Tag Archives: how-to

WorkSite tip – cleaning up your My Matters list

It’s about time I put up a post for another in the WorkSite Tips & Tricks category. This one is a couple of suggestions for helping manage your My Matters list (or My Workspaces, My files etc)

  • Use categories : rather than have one long list of shortcuts to matters, use categories to organise them into logical units (e.g. clients etc). This is a simple to do, right click on My Files and select New>Category. In the example below I have a “Group” workspaces category and then a list of my workspace shortcuts and another category which has all the IT workspaces.

categories

One of the annoyances of the FileSite app is the inability to remove >1 shortcut at a time, to tidy up for example. But there is a way to do this:-

  • To quickly remove shortcuts from My matters, rather than doing the right click delete many times, choose Add shortcuts…  From here you can go into your My Files and multi‐select shortcuts within this dialog, then delete all old workspaces in one go.
Share

Understanding WorkSite security part 2

So yesterday we went through how the security is structured across the workspaces, tabs, folders and documents. Now let’s look at how it’s applied.

Each item in WorkSite can have a default security. This applies to everyone accessing the folder, document etc. This the the “Shared As” option in properties.

You can set the “shared as” to:

  • Private – setting to this means by default any one but the creator/author won’t be able to see the workspace, folder, document etc
  • View – you can see it but access would be read only as would any property information/meta-data on the item
  • Public  – you can see the workspace, folder, document etc and edit them and their property information/meta-data

The easiest way to maintain security is to simply secure at this level. However there may be occasions where you need to secure at more advanced levels for different groups/people etc

This is where the ACL (Access Control List) comes in.

This is additional security information to the basic default security “shared as” setting above. And for the groups/people named in the ACL it will override the default “shared as” setting (e.g. if the document default “shared as” security is “View”, but I am added to the ACL with Read/Write access. Everyone else will be able to get read only access apart from me who will have write access – the author/creator will of course still have write access too)

In the ACL you can add individuals or groups of individuals and assign the following access levels (remember these will supersede the default level for those individuals/groups!)

  • Full Access – This allows full access to the document and full control over properties/meta-data and also the security (including for the folder, workspace etc)
  • Read/Write – full access  to the document, but limited control on properties/meta-data and no ability to change security (including for the folder, workspace etc)
  • Read – as it says, just allows to read documents, properties/meta-data etc
  • No Access – again as it says (remember unlike Windows where you could see the folder even if you couldn’t gain access to it, in WorkSite No Access = it’s invisible)

There are a few things worth pointing out about Groups and Individuals in terms of adding to the ACL.

  • Groups are extremely useful for workspaces that contain hundreds of documents and have security that changes regularly. This is because you can amend the security without having to refile everything (the refile action has to go through each document, folder etc and change the properties and security. On a large file this takes time!)
  • However the downside of Groups is that users of the FileSite or Desktop clients cannot add or remove people from them. This has to be done using the database administration tool.

So before you determine your security think carefully about the following to help determine the best security to apply:

  • potential size of the file (number of folders, documents etc)
  • frequency of change of individuals access requirements
  • degree of control the end user will need in maintaining the security

————–

OK now you hopefully understand a bit more about the default security and ACL. Let’s step back to how folders and documents inherit security from the parent folder, tab or workspace. Basically what we’re going to look at is limiting or opening up security within the workspace.

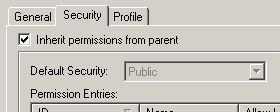
So remember the option to inherit or not?
Limiting access to sub folders or documents is easy.

You set the top level (e.g. your workspace) as open a security setting as is acceptable e.g. Public (remember this is the “shared as” default security, not in the ACL).

You can then uncheck the inherit security on the folders you wish to secure more tightly, then either change the default “shared as” security (e.g. to “View”) or add a specific ACL to those folders.

However the real difficulty is when you want to apply a more open security to sub folders. i.e. opening access to wider audience in a sub folder that at the levels above.

So say your top level (e.g. your workspace) is Private (again remember this is the “shared as” default security, not in the ACL) and maybe it is also secured in the ACL to a group or individual. In WorkSite you can only open sub folders or tabs to people specifically listed in top (i.e. workspace) ACL!

When you think about it this is logical as if you have no access to the top level you couldn’t see the workspace, so how could you expect to see a folder within it?

This isn’t so bad, but the big gripe is that it only lists Groups, not people contained in those Groups!  i.e. the workspace is secured to View in the ACL to the IT group, then you want to allow me to have read/write access to a sub-folder. Unless I am named in the ACL as an individual as well you won’t be able to pick me at a lower level even though I’m in the IT Group!

Individual documents though are a little different. These can be opened up to either Groups or Individuals that are not listed in the top level (i.e. workspace) ACL. I guess this is logical as you could search for the document by it’s document number?!

  ————–

Finally a quick note on Roles, just for completeness. These though really aren’t essential to understanding security from a WorkSite user perspective. So if your brain is full or fried stop reading now!

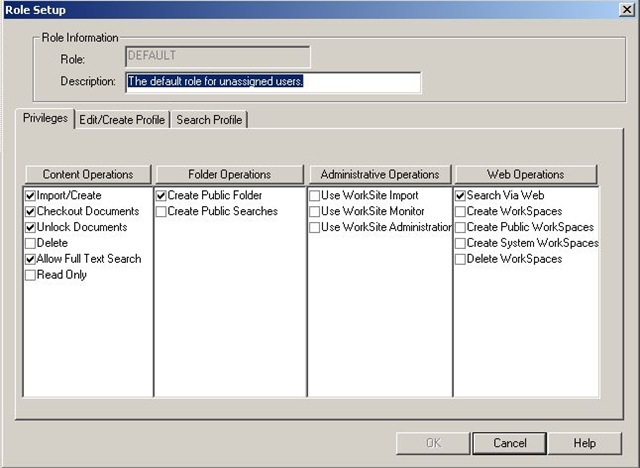
In the background your WorkSite administrator will assign users of the WorkSite system to “roles”. These are settings that basically allow some overriding “security” to be applied that a user cannot amend. It will always apply to all workspaces, tabs, folders and documents etc. So your actions available within the system will depend on the role you are placed in.

Roles apply to more specific functions, like the ability to actually create a workspace or be able to physically delete documents etc. An example of a role setting is shown below:
Share

Understanding WorkSite security – part 1

Matter Centric WorkSite security on the face of it can seem over complicated. But once you get the hang of it you can pretty much make it work well for any security requirement. This post will go through some of the basics.

First off a quick recap of the main components of WorkSite:

  • At the “top” level you have your Workspace – think of it as your filing cabinet for the matter
  • Below that you can have tabs – think of the logical dividers in that cabinet to split up your content
  • Either below a tab or in a workspace are folders – think paper folders full of a specific type of paper document in your cabinet
  • Then in the folders are your documents, emails etc

In WorkSite you can add “meta data” to your workspace (this is data that describes the workspace, so typically your client number, matter number, practice group etc). You can also secure a workspace to individuals or groups of individuals.

The tabs, folders or documents in the workspace can inherit that security (this can be changed for individual folders or documents if required).

If you know that some documents have had security changed and you want to re-apply the security from the workspace downwards then you use what WorkSite calls a “refile” action.

“Refiling” – applies the profile and security information downwards to folders and documents from the workspace (you can also refile from a tab or folder level if required)

As mentioned above you can set up folders not to inherit security. This is done with a simple checkbox on the properties of the folder (see below)

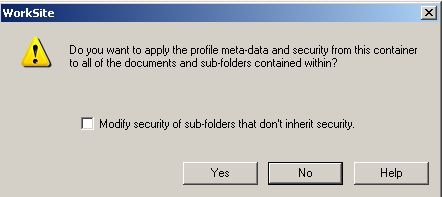
So when you refile either a workspace or tab you would get the following message. This allows you to avoid replacing security information for folders you set up not to inherit.

So if you do not want to pass the security down to folders set not to inherit, then leave the checkbox unchecked.

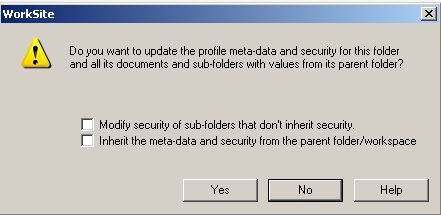
You can also chose to refile from the folder level downwards. For folders you get a similar option to pass down the security, but also an additional option asking whether you want to “re-inherit” the security from the above tab/workspace (see below).

So if you do not want to pass the security down to sub-folders set not to inherit, then leave the first checkbox unchecked.

If this folder does not inherit security and you do not want it to change to inherit. Then leave the second checkbox unchecked.

Part Two will be published tomorrow…

Share

Searching for a folder in a workspace – WorkSite help part 2

WorkSite tech help part 2

How do I search for a folder in a WorkSite workspace?

I received a query recently from a colleague, wanting to know how they could find a folder within a workspace (using FileSite). The workspace in question had grown to have 100’s of sub folders.

Using a document search was not an option as a common template had been used to create the majority of documents and thus they all happened to have names that were too similar.

What was needed was a way to find the holding folder, which was specifically named and thus could be easily identified.

We were close to concluding that the only option was to create all the holding folders as workspaces, until we came up with the following:

Start by right clicking on “My Shortcuts” (just below your My Files/Matters/Workspaces) and from the menu selecting “Add Shortcuts…” (you could do this on other levels, but as you’ll see this is more logical).

You then get the enhanced search dialogue, from here you can select to Search for a folder.

foldersearch1

Selecting this brings up a dialogue where you can pick your “database” (i.e. worksite library) where your workspace is located and add some further search terms, example below:

foldersearch2

This will return you a result list of matching folders, you can then highlight the required folder and click Select. A shortcut to that folder will be placed in your My Shortcuts for you to access your documents from etc.

Once you’ve finished working with the folder you can leave the shortcut there or just delete it.

It’s not perfect I know, but it does the trick. Let me know if you know of a simpler method?

Final point: it is much easier to search for folders in WorkSite Web, but for us most fee earners and support staff work in either FileSite in Outlook or through the MS office integrations.

Share

Saving an email attachment as a new version – WorkSite help part 1

WorkSite help part 1

Saving an attachment on an email as a new version of your document in WorkSite

This is the first in what may become an occasional series. A series of tips and tricks for software found in the Legal industry. The aim is to try and explain some of the more useful features of these pieces of software using common social media sites (like YouTube).

Today’s post is to show how you can use a very well hidden feature of Interwoven’s WorkSite 8.x to save an email attachment into the DMS (Document Management System) as a new version of your original document.

For example, you send a v1 draft out to the client for comment, he/she returns a marked up Word version that you would like to store in the DMS as v2. You can then work on v3 maintaining a full history of the document in the DMS.

Saving an attachment as a new version of your document in WorkSite 8
Share